Job Transaction Processing - File - Free Form Invoice
Use this option to create a free form invoice for a service job or field service job. Free form invoices are best used for detailed job invoices or for progress claims where you need to include descriptions of the status of the job, the work provided and associated invoice amounts.
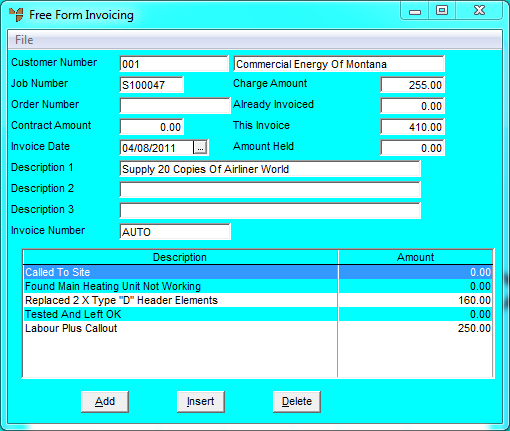
For example, if you wanted to invoice a job as follows, this would be best achieved using free form invoicing:
|
Called To Site
Found Main Heating Unit Not Working
Replaced 2 x Type D Heater Elements $160
Tested and Left OK
Labour Plus Callout $250
===========================================
Invoice Total $410
|
To create a free form invoice for a service job:
- Display the Job Transaction Processing screen for the job you want to invoice.
Refer to "Managing Service Jobs".
- When you are certain that all the material, labour and text lines are correct, select FILE | FREE FORM INVOICE.
|
|

|
Technical Tip
2.8 Feature
If Micronet has been configured to prevent stock from going negative and the quantity of an item on the invoice has resulted in a negative stock on hand quantity, the List of Items Causing Negative Stock screen displays – see "Dealing with Negative Stock (v2.8)".
|
Micronet displays the Free Form Invoicing screen.
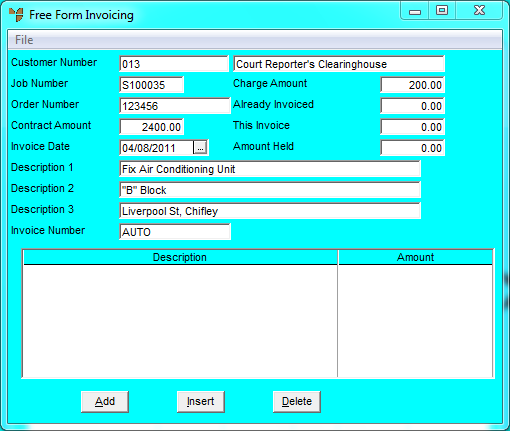
You can only change the Invoice Date and Invoice Number fields on this screen.
- Complete the following fields:
|
|
Field
|
Value
|
|
|
Customer Number
|
Micronet displays the ID and name of the debtor who will appear on the invoice.
|
| |
Job Number
|
Micronet displays the job number.
|
|
|
Order Number
|
Micronet displays the customer's order number for this job.
|
| |
Contract Amount
|
If this is a fixed price job, Micronet displays the agreed amount. This is the amount entered in the Contract Amount field on the service job header (refer to "Maintaining the Service Job Header").
|
|
|
Invoice Date
|
Micronet displays today's date as the invoice date. You can override this if required.
|
| |
Description 1, 2, 3
|
Micronet displays the job description on up to three lines.
|
|
|
Invoice Number
|
Micronet displays the next invoice number. You can override this if required.
|
| |
Charge Amount
|
Micronet displays the amount to be charged on this invoice.
|
| |
Already Invoiced
|
Micronet displays any amount already charged for this job.
|
| |
Amount Held
|
Micronet displays any amount held.
|
The buttons at the bottom of the screen allow you to enter and maintain the lines of text and amounts you want to appear on the invoice.
- If you want to:
- add a text line, select the Add button.
- insert a text line, select the line below where you want the line inserted then select the Insert button
- delete a text line, select the line then select the Delete button.
- edit a text line, double click on a text line or select a text line then press Enter.
If you selected to add, insert or edit text for the invoice, Micronet displays the Text Category screen.
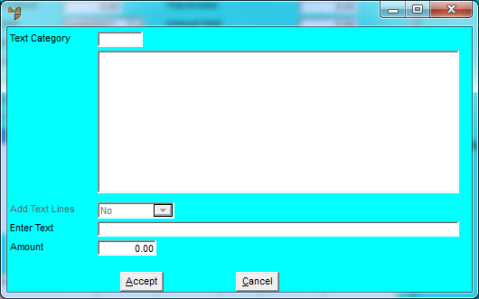
- Complete the following fields:
|
|
Field
|
Value
|
|
|
Text Category
|
If you have a Text product category setup in MDS, enter the category name. You can also press spacebar then Enter to select a text category. Micronet displays any standard lines of text in that category. Double click on the text line you want to add to the invoice. Micronet displays the line in the Enter Text field.
For more information on setting up text categories in MDS, refer to "Setting up Standard Text for Service Jobs".
|
| |
Add Text Lines
|
If you have selected a standard text line, select Yes if you want Micronet to include any additional text stored in the item text file in MDS. If you select No, Micronet only includes the standard text line in your invoice.
|
|
|
Enter Text
|
Alternatively, enter any free text you want included on the invoice. You can also edit a standard text line.
|
|
|
Amount
|
Enter any amount to appear on the invoice against the text line. If you leave this field as 0.00, Micronet does not print the amount.
|
- Select the Accept button.
If you selected to add text, Micronet redisplays the Text Category screen so you can add further text lines to the free form invoice.
- When you have finished adding text lines, select the Cancel button.
Micronet redisplays the Free Form Invoicing screen showing all the invoice lines and amounts.
- If you want to:
- save the invoice for later amendments or printing, select FILE | PROFORMA INVOICE. This does not just hold the invoice; it also allocates an invoice number. It does not, however, update the debtor account.
- print the invoice now, select FILE | PRINT INVOICE.
Micronet displays the Enter WIP for Free Invoice screen.
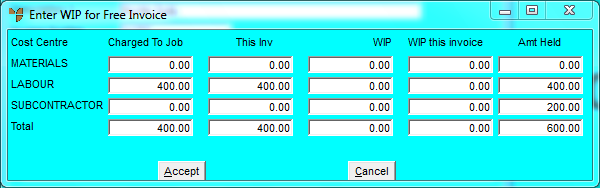
- Complete the following fields:
|
|
Field
|
Value
|
|
|
Charged to Job
|
Micronet displays the amount to be charged to the customer for each cost centre.
|
|
|
This Inv
|
Micronet displays the total amount to be charged on this invoice for each cost centre. This figure comes from the Amount against each text line in the Text Category screen.
|
| |
WIP
|
Micronet displays the Work in Progress (cost of materials and labour) for each cost centre that has not yet been invoiced to the customer.
|
| |
WIP this invoice
|
For each cost centre, enter the amount of the WIP that you want to charge the customer for on this invoice. You do not have to charge the full amount of WIP on this invoice; you can hold over a portion for a future invoice. Note that you cannot charge more than the WIP.
|
| |
Amt Held
|
Micronet displays the amount of held WIP (WIP minus WIP this invoice).
|
|
|
|
Technical Tip
It is possible to zero the invoice amount but leave a WIP amount. This will result in an invoice where the WIP cost appears as a zero charge line.
|
- Select the Accept button.
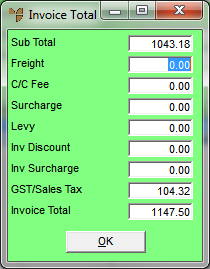
Micronet displays the Invoice Total screen.
|
|
|
Technical Tip
Some of the fields on this screen may differ depending on how your system is configured and whether you are using any additional options including freight, minimum order surcharges, levies and discounts. User defined fees and charges are setup using the Miscellaneous Charges screen in your company configuration – see "Edit Company - Edit - Misc Charges". For example, the C/C Fee and Surcharge fields shown on the screen above are user defined miscellaneous charges.
|
- Complete the following fields:
|
|
Field
|
Value
|
|
|
Sub Total
|
Micronet displays the subtotal of all lines on the invoice, excluding additional amounts such as freight, levies, surcharges and GST.
|
|
|
Freight
|
Micronet displays any applicable freight charge from your Freight master file in MDS – see "Freight Master File". You can change this or enter a freight charge if required.
|
|
|
C/C Fee, Surcharge
|
Micronet displays any user defined miscellaneous charges setup in your company configuration. In this example, you would enter the credit card fee that applies to this order, and any small order surcharge calculated, based on the total value of the order.
For more information on small order surcharges, see "Edit - Program - Small Order Surcharge".
|
|
|
Levy
|
Micronet displays the levy (if any) from the Debtor master file.
|
|
|
Inv Discount
|
Micronet displays the discount (if any) from the Debtor master file.
|
|
|
Inv Surcharge
|
Micronet displays the surcharge (if any) from the Debtor master file.
|
|
|
GST/Sales Tax
|
Micronet displays any GST or sales tax that applies to this job.
|
|
|
Invoice Total
|
Micronet displays the invoice total, taking into account all additional amounts entered on this screen.
|
- When you have finished, select the OK button.
Micronet displays the Select Output Device screen.
- Select whether you want the invoice displayed on screen, printed, saved to a specific type of file, faxed, or emailed in a specific format.
Micronet prints the invoice (if selected), changes the job status (if this is set in the Department master file), and redisplays the Job Information screen so you can create or load another service job.
